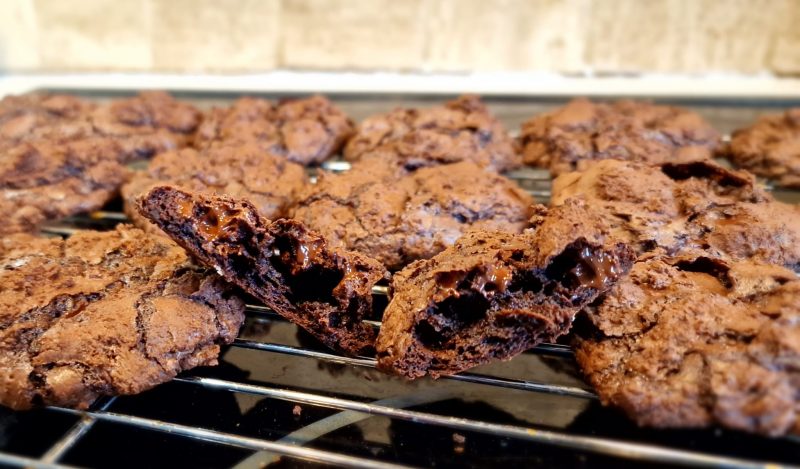
-
Apple Butter Recipes, Redux
Miz Kit’s Apple Butter Recipe
~10 pounds unprocessed/~4lbs prepared (peeled, cored, sliced) apples
1.5 cups apple juice/sweet cider
1 tsp saltPeel, core and slice the apples. Put prepared apples and apple juice into a large pot, cover, and boil until the apples are soft (about 30 minutes), stirring occasionally. Puree the mix in a blender/food processor/whatever until smooth. Turn into a deep, flat enamel-lined pan & put into a pre-heated oven at 325°F (150°C, 130°C fan assisted) and roast, stirring very occasionally, for 1-2 hours or until the puree has reduced by half.
Remove from oven. Stir in FLAVORING OF YOUR CHOICE (see below). Return to oven for 1.5 to 2 hours, stirring slightly more frequently. Jar as you normally would. Makes around 48oz/6 8oz jars.
TO FLAVOR:
Honey Apple Butter: 2 cups/500ml honeyMaple Apple Butter: 2 cups/500ml maple syrup, 1/2 c brown sugar, 1/2 tsp cinnamon
Warm Spices Apple Butter:
3-4 cups sugar
2 tsp cinnamon
1 tsp anise seeds (if you like that sort of thing)
1/2 tsp grated/ground/powdered cloves
1/2 tsp nutmegCaramel Apple Butter: 2 cups/500ml caramel
To acquire caramel if you don’t have any on hand:
Miz Kit’s Caramel Recipe:
1 1⁄2 cups granulated sugar
2 tbsp. butter
1⁄2 cup heavy whipping cream (room temp)
2 tbsp. dark brown sugar
1 1⁄2 tsp. vanilla extractIn a large saucepan over high heat, combine granulated sugar and 1⁄2 cup water. Cook without stirring, 7–9 minutes, or until a candy thermometer reads 385°. When it starts to caramelize, swirl the pan gently for even color. Make sure it turns a nice goldy caramel color before you whisk in the cream (be careful it steams SO MUCH OMG), then butter. Lower heat to medium and whisk until thick, about 1 minute longer. Remove from heat and whisk in brown sugar. Add vanilla and mix until combined. Pour hot caramel directly into the apple butter.
COOK’S NOTES:
this is a very forgiving recipe, and can be doubled, quartered, and more but I don’t have a big enough pan to, like, quadruple it, but if you have 5 pounds of processed apples, eh, just follow this & taste to see if you think it needs more sugar or anything. It’s a *very* forgiving recipe. :)Depending on how sweet your apples are, and how sweet you want your apple butter to be, ANY of these can have sugar added to them. If adding sugar to the honey butter, I would specifically recommend white, not brown, sugar, because the honey flavor can be delicate and brown sugar would overwhelm it.
-
Kitsnacks: Catie’s Vegan Fudge & Marshmallow Cream recipes
Okay, what follows are my recipes for vegan chocolate fudge, which requires homemade marshmallow fluff made with aquafaba, which is the fancy name for chickpea water.
Do not ask me why chickpea water froths up into a great meringue. This is beyond my knowledge. It works, though.
If you’re looking for something that’s just dairy-free but you’re not allergic to eggs, you can use regular marshmallow cream and save yourself a step, but this recipe goes Full Vegan.
Catie’s Vegan Marshmallow Cream
1/2 c sugar
1/4 c water
3/4 c corn syrup (lighter in color the better)
1/4 c aquafaba (chickpea liquid)
1 tsp vanillaMix sugar, water, and 1/2 c corn syrup in a stainless steel pan. Cook to 245 degrees F (firm ball) and cool for 15 minutes. While it’s cooling, place aquafaba and the remaining 1/2 c of corn syrup in a metal bowl and mix to a standing froth. Pour, and by pour I mean ‘dribble in a thin stream’ in the sugar syrup VERY, VERY SLOWLY, while running the mixer constantly, and mix until the creme is light and fluffy and of marshmallow-creme-like consistency. This takes AT LEAST several minutes, even with a stand mixer. Add the vanilla in near the end.
Jar or can (or put in the fridge in the bowl, which is what I did).
Do not cover until cold.
Catie’s Vegan Chocolate Fudge
3 c sugar
2/3 c coconut cream, well-mixed
3/4 c 100% plant-based margarine
1/2 tsp salt
12oz DARK dairy-free dark chocolate
2 c aquafaba marshmallow creme
1 tsp vanillaMix sugar, coconut cream and margarine in a sturdy stainless steel saucepan. Bring to a rolling boil, stirring constantly, and allow to boil for 5 minutes. Remove from heat, add chocolate, stir like a son of a bitch until the chocolate is entirely melted. Add vanilla and stir in. Add marshmallow creme and repeat the stirring like a son of a bitch until the creme is thoroughly mixed in.
Pour into a 9×13″ margarined pan and allow to cool. Cut before it’s entirely cool, but not when it’s too warm.
The full-length, many-notes-and-comments-incorporated how-to for the process is posted with my basic fudge recipe. :)
***
For those of you who’ve had my fudge, this vegan version is AT LEAST 85% as good as the fully loaded stuff. I’ve fed this to people without telling them & they didn’t know it wasn’t the regular stuff.
fudge for octocon -
Kitsnacks: Catie’s Basic Fudge Recipe
FUDGE:
3 c sugar
2/3 c evaporated milk
3/4 c butter or margarine
1/2 tsp salt
12oz semi-sweet chocolate chips
2 c marshmallow creme (or 1 small jar marshmallow creme)
1 tsp vanilla
1/2 c walnuts if desiredNOTES: for persons in Ireland or UK who wish to make this, the sugar must must be caster sugar; granulated makes grainy fudge. Boo, hiss. Also, semi-sweet chocolate is called plain chocolate with about a 54-60% chocolate content here, so you’d be using 12oz/2 cups of chopped plain chocolate instead. I frequently end up using 6oz darker chocolate & 6oz milk because it’s gotten harder to find plain chocolate. DO NOT use milk chocolate only, because the fudge will end up not even tasting like chocolate. It’s nasty.
If you’re in Dublin you can buy marshmallow creme (also called fluff) at the Candy Lab in Temple Bar, sometimes at Fallon & Byrne, and, quite randomly, at the Fresh grocery store on Camden Street. If you are not in Dublin/can’t find marshmallow creme, a recipe for it is at the bottom of this increasingly long post.
It is particularly important in Ireland (& possibly the UK, IDK) to use margarine instead of butter because the fat content in butter here is much higher than in the States and it wants very badly to burn when you’re making fudge. Margarine takes longer to burn, does not affect the taste, and is a much safer bet, especially for a novice fudge-maker.
Sugar cannot melt properly in non-stick pans, so it really has to be a stainless steel saucepan.
Years of experience assure me that the best and easiest way to make fudge is to have every single item you’re going to need pre-prepared: butter the pan ahead of time, have the bag of chips open (or the chocolate chopped) and sitting ready to be poured in, have the vanilla measured out, have the creme measured out/the jar opened & the inner seal taken off. Everything has to happen quite quickly at the end, before the sugar mixture loses its heat, so you really have to have everything prepared.
PREPARATION:
Mix sugar, milk and butter in a sturdy stainless steel saucepan. Bring to a rolling boil, stirring constantly, and allow to boil for 5 minutes. Remove from heat, add chocolate, stir like a son of a bitch until the chocolate is entirely melted. Add marshmallow creme and repeat the stirring like a son of a bitch until the creme is thoroughly mixed in. Add vanilla, and if you like walnuts, add them; repeat the stirring until it’s all smooth and lovely.
Pour into a 9×13″ buttered pan and allow to cool. Cut before it’s entirely cool, but not when it’s too warm.
Peanut butter fudge can be made by substituting a cup of peanut butter instead of 2 cups of chocolate.
Generally speaking it takes some practice to get the fudge consistency just right. I’m very good at it (I said modestly). If you cook it too long it gets hard and crumbly; too short a time and it’s squishy. I usually start the timer when the sugar mix hits a rolling boil, cook for five minutes, then give it another 20 seconds to make sure it was *really* a rolling boil when I began. :) And you really do need to stir constantly, and scrape the pan sides, because the whole mix will burn very easily and quickly if you don’t. :)
MARSHMALLOW CREME:
(Frankly, I don’t recommend this unless you’ve got a stand mixer.)1/2 c sugar
1/4 c water
3/4 c corn syrup (lighter in color the better)
1/4 c egg whites (like…2 egg whites)
1 tsp vanillaMix sugar, water, and 1/2 c corn syrup in a stainless steel pan. Cook to 245 degrees F (firm ball) and cool for 15 minutes. While it’s cooling, place egg whites and the remaining 1/2 c of corn syrup in a metal bowl and mix to a standing froth. Pour, and by pour I mean ‘dribble in a thin stream’ in the sugar syrup VERY, VERY SLOWLY, while running the mixer constantly, and mix until the creme is light and fluffy and of marshmallow-creme-like consistency. This takes AT LEAST several minutes, even with a stand mixer. Add the vanilla in near the end.
Jar or can (or put in the fridge in the bowl, which is what I did).
Do not cover until cold.
-
Kitsnacks: Pecan Pie (updated)
My husband is starting a new job on Tuesday (a promotion! Yay!), & upon hearing he was leaving, his coworkers offered the appropriate congratulations and speeches of woe, the latter of which included, “b..b..but…but…pecan pie…???”
So I’m making them a pecan pie, & have finally perfected my process for the recipe I invented several years ago. It is as follows, although it should be noted that I tend to make deep-dish pies, and for your average 9″ pie this should probably be cut in half. Or you should make two. Also an excellent option. :)
CATIE’S PECAN PIE
1 cup brown sugar
1 1/2 tbsp molasses
1/4 cup white sugar
1/2 cup butter
1/8 cup water
4 eggs, room temperature
2 tbsp all purpose flour
1 tbsp milk
1 tsp vanilla
4 cups pecans, choppedFirst off, spray a measuring spoon with cooking spray or something so the molasses will come out of it easily, otherwise you’ll be here all day. Don’t worry about being too exact with it, though. If it’s two tablespoons, ain’t nobody gonna cry. After some experimenting on my end, though, be a bit cautious in going too far over that, because molasses is a very strong flavor and can get a little sharp in the background of the pie.
Melt the butter in a small saucepan with the sugars, molasses, and water. Bring it to a low boil; we’re just trying to make sure the sugars aren’t crystallized in your custard. Okay? Okay. Good.
Put the pan aside to cool a little while while you make your crust & custard. And look. The custard? What I’m gonna describe is ever so slightly finicky. I know, I know, does it REALLY matter? But it does, because this keeps the flour from lumping. So trust me, okay? Okay. Good.
Put the flour in a medium-small bowl. Add the milk & vanilla. Whisk these 3 ingredients into a paste. It’ll only take a minute and the vanilla will make it smell good.
Break one egg in. Whisk it in completely before doing the next, and the next, and the next, and the last.
I know, I know. Does it REALLY matter? I’ve made this pie a dozen times. Tonight’s custard turned out better than any other I’ve done, because I used this process. Trust me. Trust me.
I’m assuming you already chopped your pecans up. If you didn’t, go ahead and do that. Or don’t, as you prefer. I actually like to chop about, IDK, 2/3rds of them? And then leave the rest verging on whole, for Big Chunks Of Pecan. Om nom nom.
Make your pie crust (go on, it’s not that scary. Give it a try).
Then pour the warm sugar mix into the custard, and listen, amis. Again, this is sort of a pain, but it’s the Right Thing To Do: drizzle it in while whisking briskly.
Obviously it takes longer that way, sure, of course it does. But you don’t want to cook the egg with the warm sugar mix, so go slowly. We’re only talking 2-3 minutes anyway, not, like, an hour. Enjoy the scent, bc it’s gonna smell SO GOOD. All that butter & molasses. Mmmm.
Then pour your pecans in & mix until they’re thoroughly covered. Do not, for the love of heaven, whisk them in. I keep doing that and then there’s goddamn pecans stuck in the goddamn whisk and nobody’s happy. Use a wooden spoon or rubber spatula. Okay? Okay. Good.
Oh, shit, I told you to preheat the oven, right? Right, go back up to the top and preheat it. 425°F, A Hot Oven. Et voila, by the time you get this far, your oven is preheated. Great.
Pour your pecan custard into the pie shell & put it in the oven. Bake at 425 for 15 minutes.
REDUCE THE HEAT to 325°F. Bake for at least another 30 minutes, probably more like 45, until a fork inserted in the centre comes out clean.
Allow to cool. Eat with whipped cream or ice cream, as you like it.
Ted says this is the best pecan pie he’s ever had. I hope it’s the best you’ve ever had, too.
-
Kitsnacks: Chili
I’ve been mucking about with chili recipes for ages trying to come up with one that I particularly liked, and I think I’ve finally nailed it.
Catie’s Chili
2-3 tbsp vegetable oil
1 onion
2 bell peppers
4 cloves garlic, smashed
2 tsp cumin
1 tsp coriander
1 tsp oregano
1 tsp smoked paprika
1 tsp chili powder
1/2 tsp salt
2 cans diced tomatoes
1 heaping tbsp tomato paste
1 c vegetable stock
2 cans kidney beans, rinsed
1 c frozen corn
1 lb (500gm) stew meat, if desiredHeat the oil a bit while you chop the onions into whatever size bits most suits you. Throw the onions into the oil, turn the temperature up to pretty high, and stir occasionally while you’re chopping up the bell peppers into whatever size most suits you. (I like red & yellow ones, which has no bearing on how they’re chopped.) Throw the peppers in with the onions. Stir whenever you remember to. Let them get nice and soft. This takes more than 5 minutes, no matter what other recipes want you to believe.
Put all the spices into a small bowl together. Stir, if you’re feeling really into it. Chop up the meat into smaller bits, if you’re having a chili con carne. Smash the garlic, toss it in, & stir for a minute or so while it browns. You actually have to do this particular bit of stirring or it’ll burn, and burned garlic is nobody’s fave.
If you’re having chili con carne, throw the meat in now & brown it up. If you’re not having chili con carne, skip this paragraph.
Stir the spices in, likewise stirring so they blend and don’t burn. Turn the heat down a bit.
Add the rest of the stuff. Tomatoes first. Maybe you like quite dry chili. Put the first can’s worth in, decide if it looks wet enough. (I didn’t think it did.) Put the second one in. Oh, wait, the tomato paste, put that in. When we say “1 heaping tablespoon” what we mean is “2 tablespoons but who could possibly be bothered to measure two tablespoons of tomato paste.” Maybe you don’t need vegetable stock. Probably you do, though. It’s got all those flavoids. Add the stock. Yeah, that looks about right, now. Oh shit, don’t forget the corn! Okay, the corn is in. Hey, that smells pretty good and it looks nice. Whew, that’s a relief.
Put a lid on it. Set to simmer and come back to stir occasionally. Worry that probably that’s too much liquid after all. Try to set the lid on an angle to let some more of the heat escape. The lid falls back down to fitting properly, but it turns out that’s okay because the amount of liquid when it’s done, after about an hour of simmering and then another hour of sitting on the stove with the heat off while you Skype with family, ends up being exactly perfect.
Eat with cornbread muffins.
(This is definitely good chili, but I also have a cold and may need to tweak it some when I can taste things more, uh, better. Still, it’s a good place to start.)